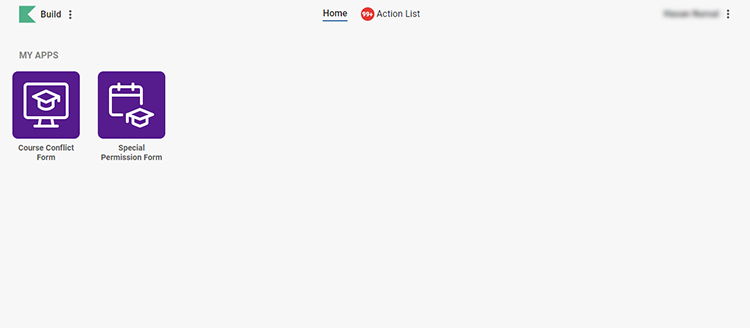
Kuali Build App

Kuali Build is a code-free tool that end-users can use to create forms and approval workflows in a safe, secure and centrally managed way.
This platform is designed specifically to fill the growing needs of higher ed institutions as they move through a digital transformation.
Kuali Build App can only be used by Western Engineering staff, students and faculty
How to create a form?
Step 1

- Click on https://uwo.kualibuildca.com/app/builder/#/home
- Enter your Western username and password.
Step 2
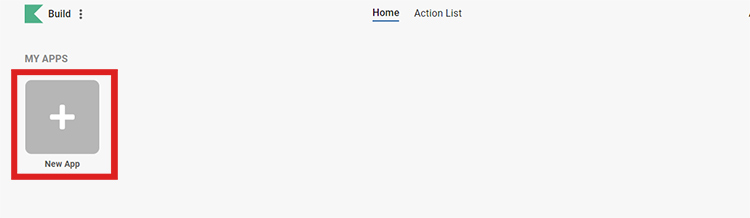
- Click on 'New App' to create a form page.
Step 3
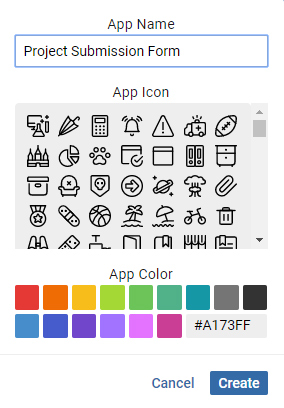
- Enter the name of the form and click on 'Create' button.
- You can also select an icon and color.
Step 4
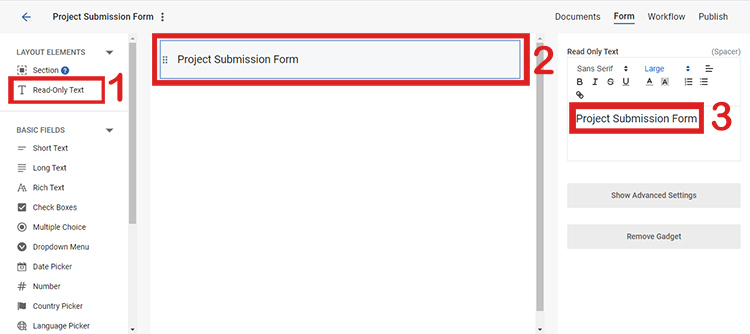
- Let's create the title of the form first.
- First, select the 'Read-Only Text' element. Second, drag and drop it on the page ( see the second red field above )
- Third, You can enter the name of the title in text editor. ( see the third red field above )
Step 5
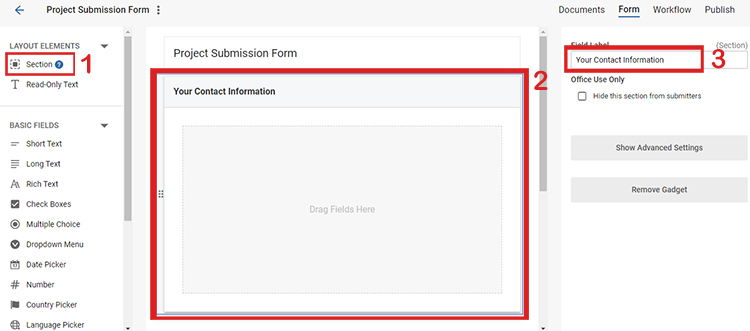
- Every form field has their own section.
- First, select the section.
- Second, drag and drop it on the form page
- Third, enter the name of the title for this section.
Step 6
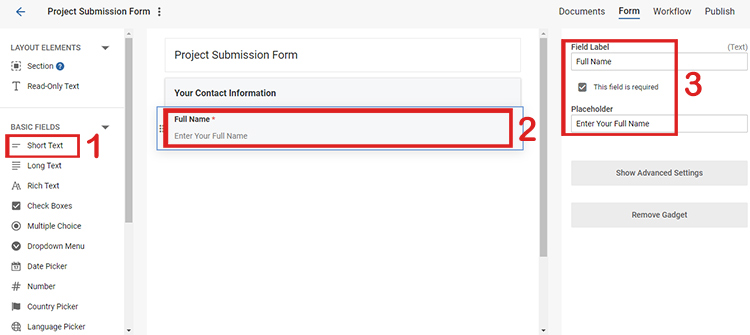
- We'd like to add a 'Name' element in our form. Firstly, select the 'Short Text'.
- Secondly, drag and drop it in the section we created in the previous step.
- Finally, enter the name, placeholder and check the checkbox if this field is required.
Step 7
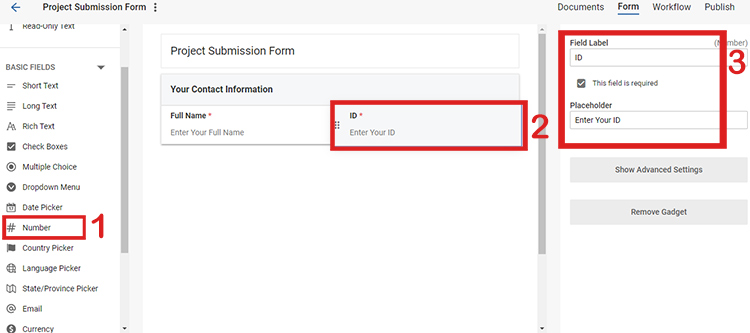
- In same section, we'd also like to add a 'Number' element called ID.
- Drag and drop the Number element on the page.
- Then you can add a name, placeholder and check the checkbox for this number field.
Step 8
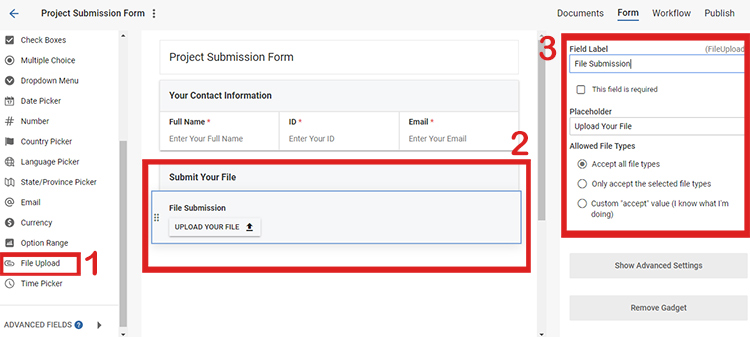
- Now we add an another section called "Submit Your File".
- After selecting the 'File Upload' element, drag and drop it on the form page.
- Then enter the label names and select the file types according to your needs.
- Finally, this form looks like ready to go.
Step 9
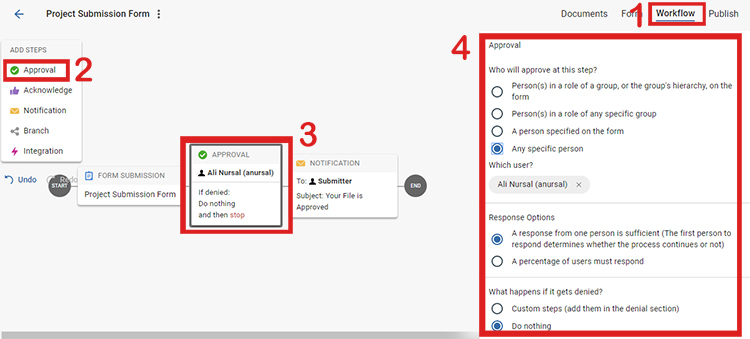
- Let's move to the other page called "Workflow".
- You can add 'Approval' step to your workflow.
- In order to add 'Approval' step, just drag and drop it on the flow.
- Finally, determine who will approve this step on the right menu. Then don't forget to click on 'Save' button on the bottom of the right menu.
Step 10
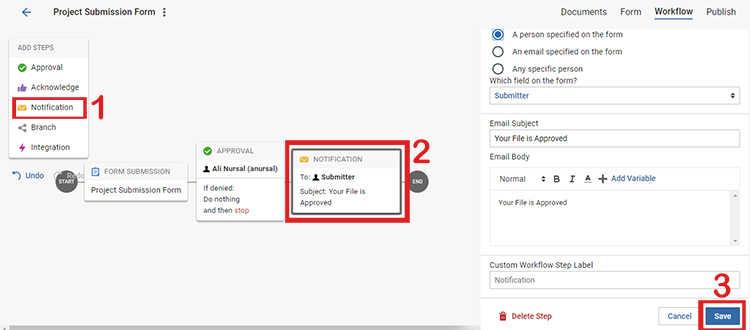
- You can also add 'Notification' step to your workflow in order to get notifications.
- Just drag and drop the 'Notification' step on your workflow.
- After deciding who is going to get Notification email, enter the Email subject and body. Then click on 'Save' button.
Step 11
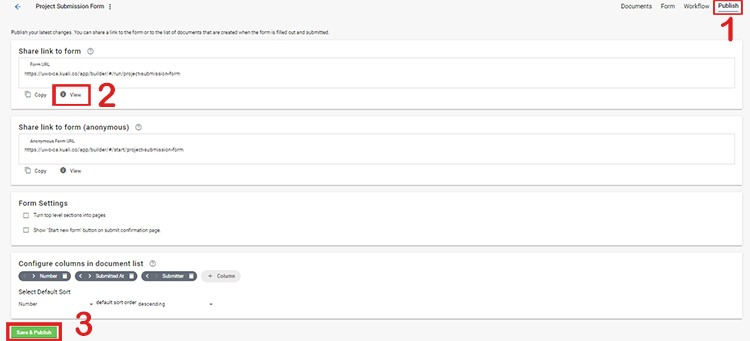
- The last step is publishing the form.
- You can view the form on this page.
- Finally, if you click on 'Save&Publish' button, you will publish the form that you just created.
Step 12
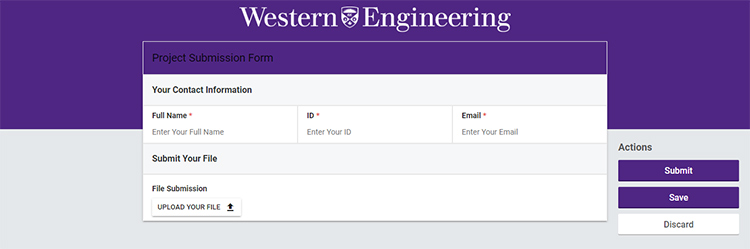
- Looks like the form is ready to use.
Step 13

- You can always check the status of each form submission on 'Documents' page.
- You can view or edit the status of each form submission by clicking the eye or pencil icon.
How to approve a form?
Step 1
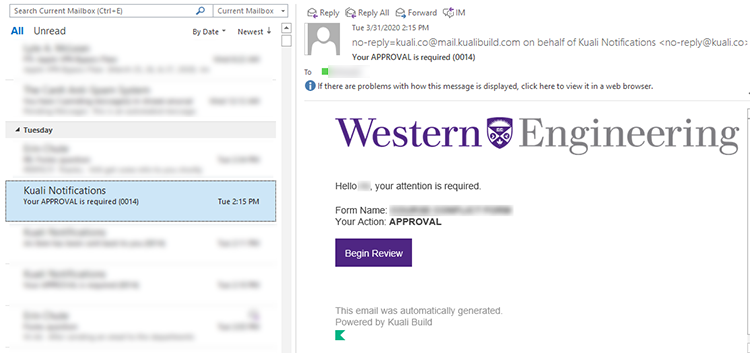
- You will get a Kuali Notification email that says "Your APPROVAL is required".
- Before clicking on the button, check the form name in the email.
- Then click on "Begin Review" button.
Step 2
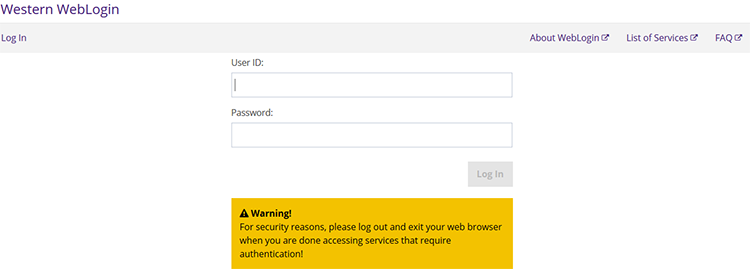
- Enter your Western username and password.
- Then click on "Log In" button.
Step 3
- You can review all the form. If necessary, you can fix/change the form inputs.
- There are 3 buttons:
- When you are ready to approve, click on "Approve" button.
- If you want to send this form back to the submitter to fix something, you can click on "Send Back" button with adding a comment. After submitter fix/update the form and re-submit, you will get another email to approve.
- If you want to reject this form, you can click on "Deny" button. Then workflow will stop and submitter will get a Denied email.
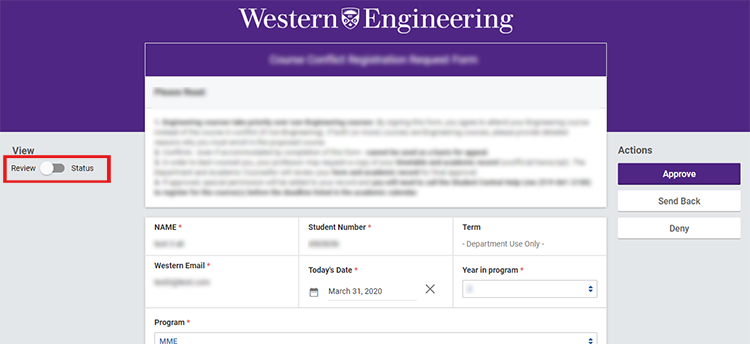
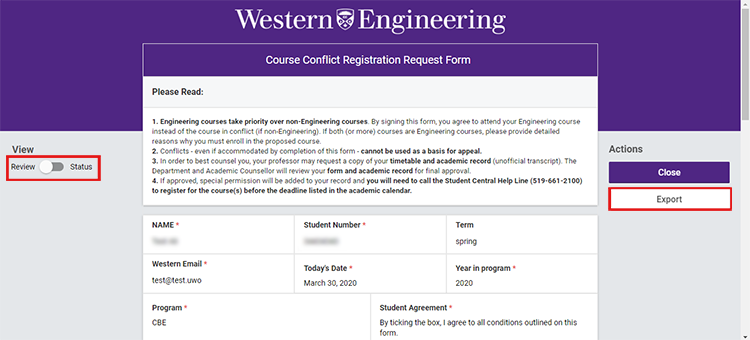
- Before clicking on "Approve" button, you can use Toggle switch button to visit the "Status" page.
Step 4
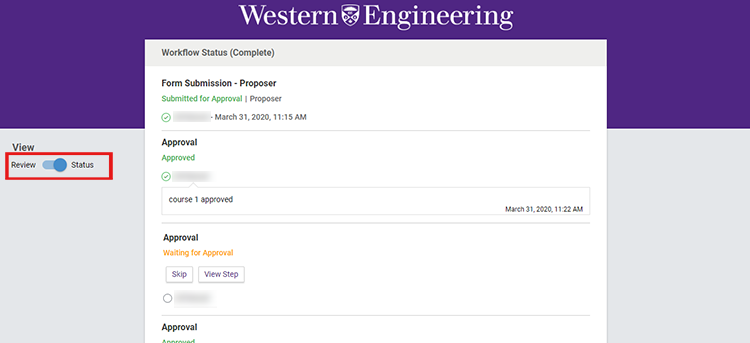
- You can see who approved or who is waiting for approval on the "Status" page.
- You can also see comments from people who approved the form.
Step 5
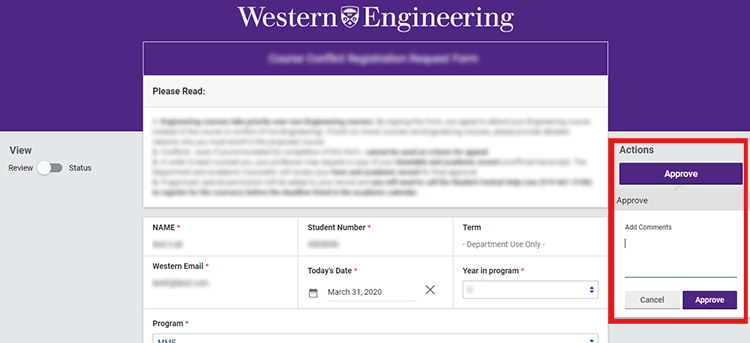
- When you go back to "Review" page, you can click on "Approve" button .
- Then you can add comments and click on "Approve" button again. (See printscreen above)
- After clicking on "Approve" button, you will see this message: This form has been approved.
Documents
Step 1
- Click on this link: https://uwo.kualibuildca.com/app/builder/#/home
- Enter your Western username and password.
- Then click on "Log In" button.
Step 2
- Click on the related form.
- Note: You must have a permission to see these forms. Otherwise, you won't be able to see the forms on this page.
Step 3

- You can see the list of submitters on 'Documents' page of the related form.
- You can filter all kind of information for each of submitters.
- Click on 'Columns' title.
Step 4
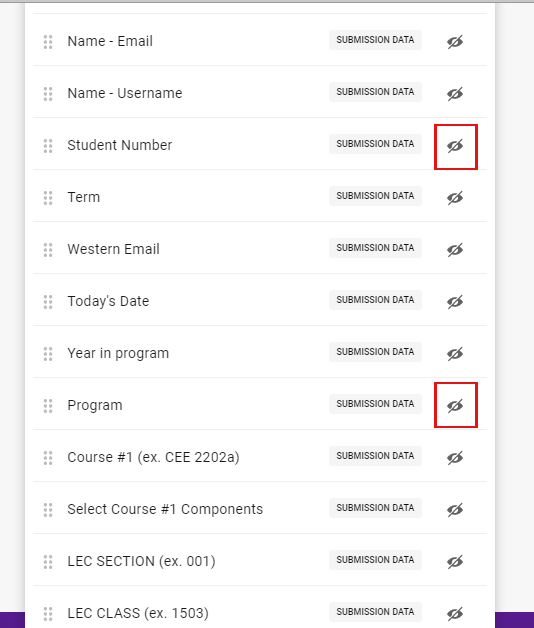
- You can click the eye icons if you want to see more information.
- For example, if you want to have 'Program' or 'Student Number' on the list, just click their eye icons.
Step 5
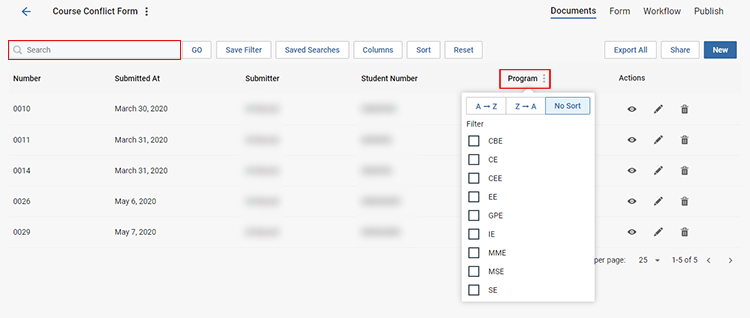
- You can filter program by clicking on the 'Program' title on the list .
- You can also search any information to find a submitter.
Step 6
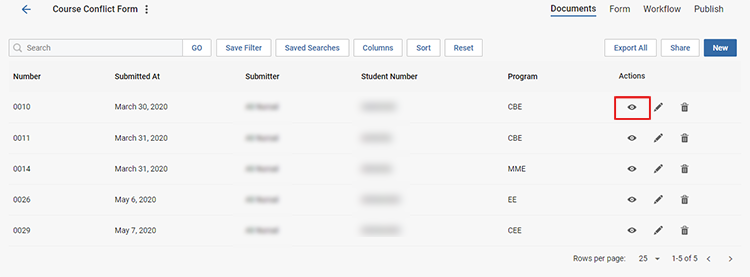
- You can click the 'View' button to go the form of the submitter.
Step 7
- You can review the form and the status of the submitter on this page.
- You can also export all the form information as a text file.
ITG Online Forms
- • Grad Student HPC Request Form
- • Student Remote Desktop Access Request Form
- • Application Use Request
- • ROAMs Access Form For Faculty & Staff
- • Network Registration Form
- • ITG Onboarding Checklist
- • Engineering Classroom Support On-Call